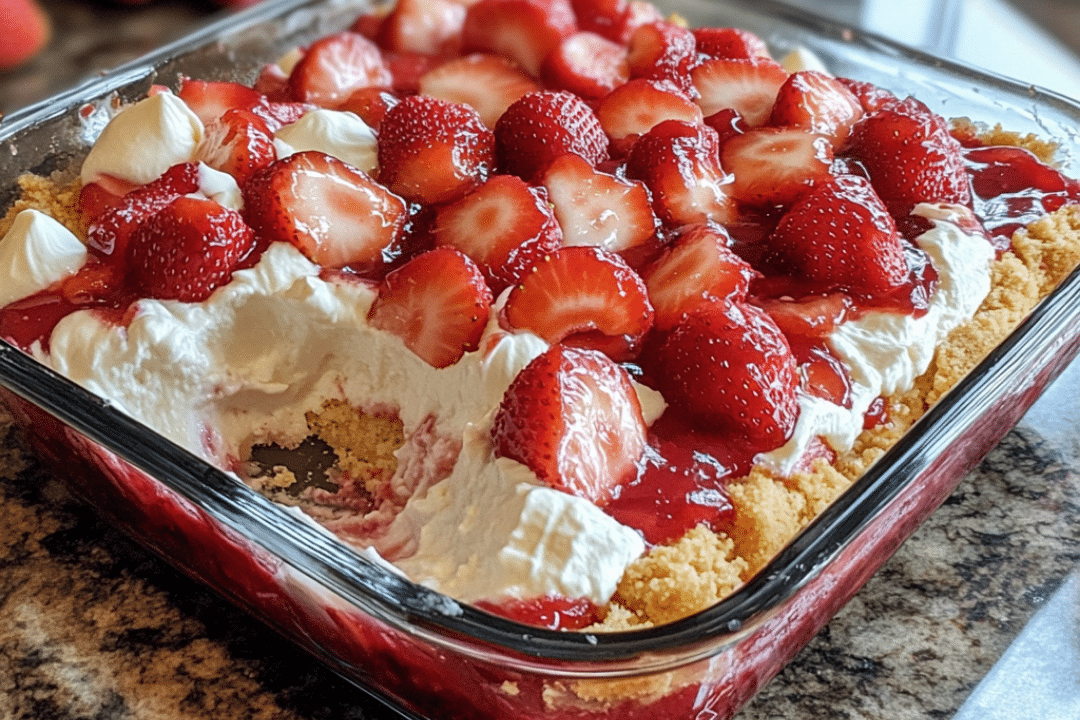
If you’re craving a dessert that’s both indulgent and easy to make, look no further than this Strawberry Cheesecake Dump Cake! This delicious treat combines the rich, creamy flavor of cheesecake with the fruity sweetness of strawberries, all topped with a golden, buttery cake crust. The best part? It’s a dump cake, meaning you simply layer the ingredients, pop it in the oven, and let it work its magic. No complicated steps, no mixing, just a mouthwatering dessert that’s perfect for any occasion.
This dessert is great for those who want a quick yet impressive dessert to serve at family gatherings, parties, or potlucks. With the ease of preparation and the delightful flavors of cheesecake and strawberry, it’s sure to become a family favorite. The balance of tangy cheesecake, sweet strawberry filling, and soft cake topping makes this dessert the perfect way to satisfy your sweet tooth without spending hours in the kitchen.
Why You’ll Love This Recipe
Strawberry Cheesecake Dump Cake is the ideal dessert for those who want to enjoy a decadent treat without all the work. The combination of creamy cheesecake and fresh strawberries creates a flavor that’s both indulgent and refreshing. Using just a handful of ingredients, you can create a dessert that tastes like it came from a bakery, yet requires minimal effort. With a crisp, golden cake topping and a gooey, creamy center, this dump cake is sure to be the star of any dessert table.
Ingredients
- Yellow cake mix
- Strawberry pie filling
- Cream cheese (softened)
- Granulated sugar
- Unsalted butter (melted)
- Vanilla extract
- Optional: Fresh strawberries and whipped cream for garnish
Variations
Use Other Fruit Pie Fillings:
While strawberry is delicious, you can easily swap it for other fruit fillings like blueberry, cherry, or apple to make different versions of this dump cake. Try mixing and matching your favorite flavors to create a personalized dessert.
Add a Crumble Topping:
For a bit of extra texture, sprinkle a handful of crushed graham crackers or nuts on top of the cake mix before baking. This adds a crunchy layer that pairs wonderfully with the creamy cheesecake filling.
Make it Chocolate:
For a chocolatey twist, you can substitute the yellow cake mix with a chocolate cake mix and use a chocolate ganache or pudding mix in place of the cream cheese filling. The strawberry filling still pairs perfectly with the chocolate for a delicious combination.
How to Make the Recipe
Step 1: Preheat Oven
Start by preheating your oven to 350°F (175°C). Grease a 9×13-inch baking dish to prevent the cake from sticking.
Step 2: Layer the Ingredients
Begin by spreading the entire can of strawberry pie filling evenly across the bottom of the baking dish. This will serve as the fruity base of the cake. Then, in a medium bowl, beat the softened cream cheese with sugar and vanilla extract until smooth. Drop spoonfuls of the cream cheese mixture over the strawberry filling. Don’t worry about making it perfect—small pockets of cheesecake are part of the charm.
Step 3: Add Cake Mix
Next, evenly sprinkle the dry yellow cake mix over the cheesecake and strawberry layers. Do not stir—just let the dry cake mix rest on top.
Step 4: Butter Time
Drizzle the melted butter evenly over the dry cake mix. Be sure to cover as much of the surface as possible to create a golden, buttery crust during baking.
Step 5: Bake
Place the baking dish in the preheated oven and bake for 40-45 minutes, or until the top is golden brown and bubbly. The cake should be set in the center and the edges should look slightly crispy.
Step 6: Cool & Serve
Once the cake is baked, let it cool slightly before serving. For a fun, extra touch, garnish with fresh strawberries and a dollop of whipped cream. Enjoy this creamy, fruity, and oh-so-delicious dessert!
Tips for Making the Recipe
- Even Cake Mix Layer: To ensure the top layer of the cake cooks evenly, sprinkle the cake mix as evenly as possible, but don’t worry if it’s not perfect. It will still come out delicious!
- Make Sure the Butter is Melted: Melt the butter before drizzling it over the cake mix to ensure it spreads evenly and creates a golden crust.
- Chill the Cheesecake Mixture: If you prefer a firmer cheesecake layer, you can chill the cream cheese mixture before adding it to the pie filling.
- Test for Doneness: Check the cake after 40 minutes of baking. If the top is golden brown and bubbly, it’s done. If it’s still wet in the center, bake for a few extra minutes.
How to Serve
Serve Strawberry Cheesecake Dump Cake warm, and enjoy it on its own or with a side of whipped cream or vanilla ice cream. Fresh strawberries on top make it extra special. This dessert pairs beautifully with a cup of coffee or a refreshing glass of iced tea, making it perfect for any casual or formal occasion.
Make Ahead and Storage
Storing Leftovers
Leftovers can be stored in an airtight container in the refrigerator for up to 3 days. The cake will continue to absorb the flavors and become even more delicious the next day.
Freezing
If you want to make this dessert in advance, you can freeze it for up to 3 months. After baking, let the cake cool completely and then cover it tightly with plastic wrap and foil before freezing. To reheat, thaw in the refrigerator overnight and bake at 350°F for about 15-20 minutes until warmed through.
Reheating
To reheat individual servings of leftover cake, microwave on high for 20-30 seconds, or until warm. You can also place a slice in the oven at 350°F for 10 minutes if you prefer a crispy top.
FAQs
1. Can I use a different type of cake mix?
Yes, you can use chocolate, white, or even spice cake mix for a different flavor profile.
2. Can I make this without the cream cheese?
While the cream cheese gives this recipe its cheesecake flavor, you can omit it for a simpler, more traditional dump cake. The strawberry filling will still be delicious!
3. How can I make this recipe gluten-free?
You can substitute the yellow cake mix with a gluten-free cake mix to make this recipe gluten-free. Be sure to check that the pie filling and other ingredients are gluten-free as well.
4. Can I use fresh strawberries instead of pie filling?
Fresh strawberries can be used in place of pie filling, but you may need to cook them down with a bit of sugar to create a sweet, syrupy consistency similar to the pie filling.
5. How do I know when the cake is done?
The top should be golden brown and bubbly. You can also insert a toothpick in the center to check for doneness—if it comes out clean, the cake is ready.
6. Can I freeze this cake?
Yes, you can freeze this dump cake for up to 3 months. After baking, allow it to cool, then wrap it tightly for storage.
7. Can I use a different fruit filling?
Yes, feel free to experiment with other fruit pie fillings like blueberry, cherry, or peach for a unique twist on the recipe.
8. Can I use light cream cheese?
Yes, light cream cheese can be substituted for regular cream cheese, but it may slightly alter the texture of the cheesecake layer.
9. Is it necessary to chill the cake after baking?
It’s not necessary, but chilling for an hour can make it easier to slice and serve.
10. Can I add a crumble topping?
Yes, you can sprinkle crushed nuts, granola, or graham cracker crumbs on top of the cake mix before baking for added texture.
Conclusion
Strawberry Cheesecake Dump Cake is the ultimate simple dessert that’s packed with flavor and sure to impress everyone who tries it. The sweet and tangy cheesecake layer, the fruity strawberry filling, and the buttery cake topping all come together in a dessert that’s perfect for any occasion. Whether you’re preparing for a holiday celebration or just a casual family dinner, this easy-to-make cake will become a go-to favorite. Enjoy it as-is, or top it with whipped cream and fresh strawberries for an extra-special touch!
Print
Strawberry Cheesecake Dump Cake
- Total Time: 50 minutes
- Yield: 8 servings 1x
Description
This Strawberry Cheesecake Dump Cake is an easy and decadent dessert that combines the fruity sweetness of strawberry pie filling, the creamy richness of cheesecake, and a golden cake topping. It’s a no-fuss, one-pan dessert perfect for any occasion, and it’s especially great for serving a crowd!
Ingredients
- 1 box yellow cake mix
- 1 can (21 oz) strawberry pie filling
- 1 package (8 oz) cream cheese, softened
- 1/2 cup granulated sugar
- 1/2 cup unsalted butter, melted
- 1 tsp vanilla extract
- Optional: Fresh strawberries and whipped cream for garnish
Instructions
- Preheat Oven:
Preheat your oven to 350°F (175°C). Grease a 9×13-inch baking dish. - Layer the Ingredients:
- Base: Spread the entire can of strawberry pie filling evenly across the bottom of the baking dish.
- Cheesecake Layer: In a medium bowl, beat the cream cheese, sugar, and vanilla until smooth. Drop spoonfuls of the cream cheese mixture over the pie filling. Don’t worry about being perfect—little pockets of cheesecake are part of the charm!
- Add Cake Mix:
Sprinkle the dry yellow cake mix evenly over the top of the strawberry and cream cheese layers. Do not stir! - Butter Time:
Drizzle the melted butter evenly over the top of the cake mix. Try to cover as much of the surface as possible. - Bake:
Bake for 40-45 minutes, or until the top is golden brown and bubbling. - Cool & Serve:
Let the cake cool slightly before serving. For extra flair, garnish with fresh strawberries and whipped cream. Enjoy this sweet, creamy, and fruity delight!
Notes
- Storage: Store any leftovers in the refrigerator for up to 3 days.
- For a Fun Twist: Try adding a handful of chocolate chips or crushed graham crackers on top of the cake mix before baking for a cheesecake crust effect.
- Prep Time: 10 minutes
- Cook Time: 40 minutes

