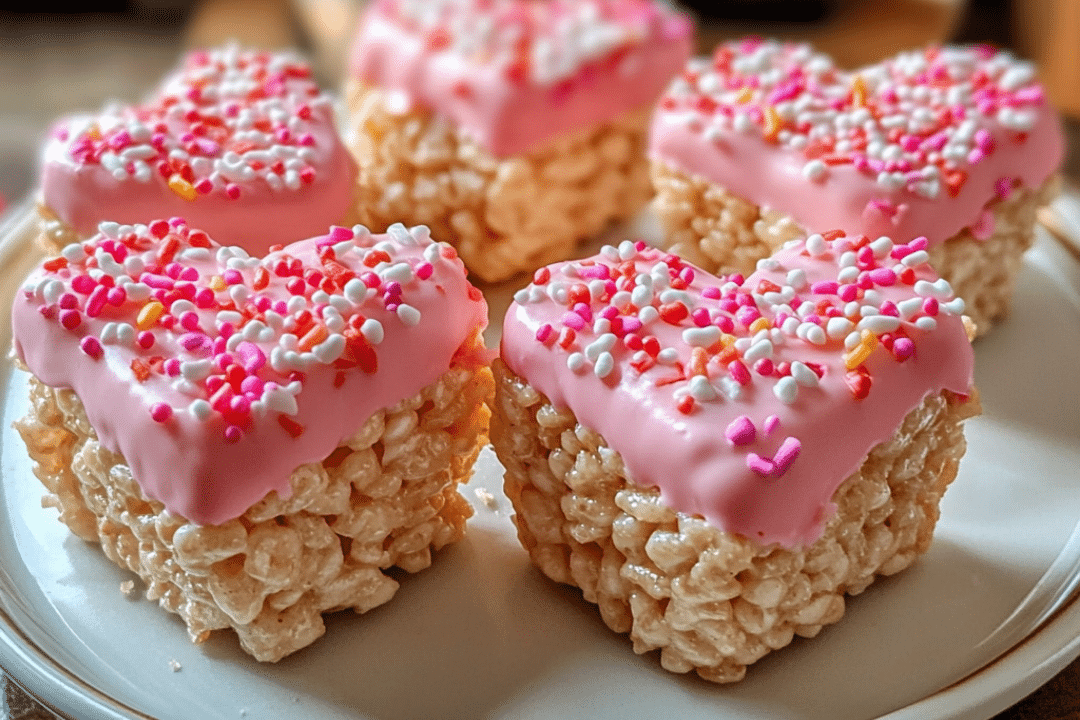
Valentine’s Day is the perfect occasion to indulge in some sweet treats, and these Valentine Rice Krispie Treats are both fun and delicious. With vibrant candy melts in every color of the rainbow and a hint of creativity, this recipe turns a classic favorite into a festive celebration of love. Whether you’re making them for a special someone, a classroom party, or just as a fun family activity, these treats are sure to bring a smile to everyone’s face. They’re easy to make, visually stunning, and deliciously gooey, thanks to the mini marshmallows and butter that form the base of the Rice Krispies. By adding colorful candy melts and edible markers, you can transform these simple treats into the perfect Valentine’s Day gift or dessert.
Why You’ll Love This Recipe
These Valentine Rice Krispie Treats take the classic Rice Krispies treat to a whole new level. With their colorful appearance and fun decorating options, they’re perfect for the holiday or any occasion that calls for a little extra sweetness. The chewy, marshmallow-filled Rice Krispies combined with a colorful array of candy melts create a visually appealing dessert that’s both satisfying and fun to make. Kids and adults alike will love the hands-on experience of decorating the treats and personalizing them with edible markers. Plus, the candy melts provide a little extra sweetness and a fun pop of color, making these treats as festive as they are tasty.
Ingredients
- Mini marshmallows (10 ounces)
- Butter (1/4 cup)
- Rice Krispie cereal (6 cups)
- White candy melts (1/2 cup)
- Pink candy melts (1/2 cup)
- Purple candy melts (1/2 cup)
- Blue candy melts (1/2 cup)
- Orange candy melts (1/2 cup)
- Green candy melts (1/2 cup)
- Yellow candy melts (1/2 cup)
- Edible marker
- Shortening (1-2 tablespoons, if needed)
Variations
While this Valentine Rice Krispie Treats recipe is colorful and festive, there are many ways to make it your own:
- Add sprinkles: Once the candy melts are applied, sprinkle some heart-shaped sprinkles or other fun, colorful decorations on top to add extra flair.
- Use different colors: Swap out the candy melts for your favorite colors. Red, pink, or gold can be especially perfect for Valentine’s Day.
- Add flavored extracts: Infuse your Rice Krispie treats with a subtle flavor by adding a few drops of vanilla extract, almond extract, or even peppermint extract to the melted marshmallow mixture.
- Make them heart-shaped: Once the Rice Krispies are pressed into the pan, use a heart-shaped cookie cutter to create Valentine’s Day-themed shapes.
How to Make the Recipe
Step 1: Melt the Butter and Marshmallows
In a large saucepan, melt the butter over medium heat. Once the butter is melted, add the mini marshmallows. Stir constantly until the marshmallows are fully melted and smooth.
Step 2: Mix in the Rice Krispies
Once the marshmallow mixture is smooth, remove it from the heat and add the Rice Krispie cereal. Stir gently until the cereal is fully coated with the marshmallow mixture.
Step 3: Press the Mixture into a Pan
Transfer the Rice Krispie mixture to a greased 9×13-inch pan or a baking dish. Use a spatula or your hands (dampened to avoid sticking) to press the mixture down into an even layer.
Step 4: Melt the Candy Melts
In separate microwave-safe bowls, melt the candy melts in 30-second intervals, stirring between each, until fully melted. If the candy melts seem too thick, add 1-2 tablespoons of shortening to each bowl to thin them out for smoother application.
Step 5: Drizzle the Candy Melts
Once the candy melts are melted and smooth, drizzle them over the Rice Krispie treats in colorful patterns. You can swirl the colors together, create stripes, or drizzle them randomly for a fun, festive look.
Step 6: Decorate with Edible Markers
After the candy melts have set slightly but are still soft, use edible markers to add designs, letters, or shapes to your Rice Krispie treats. Personalize them with fun Valentine’s Day messages or draw hearts and flowers for an extra festive touch.
Step 7: Let the Treats Set
Allow the treats to cool completely before cutting them into squares or fun shapes. If you used candy melts, be sure they harden before serving.

Tips for Making the Recipe
- Avoid sticky hands: Grease your spatula or hands with butter or cooking spray when pressing the Rice Krispie mixture into the pan to avoid sticking.
- Be patient with the candy melts: When melting the candy melts, use short intervals in the microwave and stir thoroughly to avoid burning the chocolate.
- Cool before cutting: Allow the treats to cool completely before cutting them into squares or shapes to avoid them falling apart.
How to Serve
Valentine Rice Krispie Treats are perfect for:
- Valentine’s Day parties: Serve these treats on a platter at any party or gathering.
- Classroom snacks: They’re easy to cut into smaller squares or shapes, making them perfect for handing out at school.
- Gift-giving: Package the treats in a decorative box or bag to give as a homemade Valentine’s gift.
- Special dessert: Serve these fun treats as a fun and colorful dessert after dinner or as a sweet afternoon snack.
Make Ahead and Storage
Storing Leftovers
Store any leftover Rice Krispie treats in an airtight container at room temperature for up to 4-5 days. They will stay fresh and chewy, but make sure the container is sealed tightly to prevent them from getting hard.
Freezing
Although Rice Krispie treats freeze well, the candy melt drizzle may lose some of its shine and texture when thawed. If freezing, store the treats in a single layer in a freezer-safe container, with wax paper between layers. Freeze for up to 3 months.
Reheating
Reheating isn’t necessary for Rice Krispie treats since they are best enjoyed at room temperature. However, if they are a bit too firm, place them in the microwave for a few seconds to soften them up.

FAQs
1. Can I use marshmallow fluff instead of mini marshmallows?
Yes, you can use marshmallow fluff, but it may result in a slightly different texture. Use about 7 ounces of marshmallow fluff to replace the 10 ounces of mini marshmallows.
2. Can I make these treats gluten-free?
Yes, Rice Krispies now have gluten-free options available, so make sure to use them if you’re looking to make the treats gluten-free.
3. Can I use other types of candy melts?
Absolutely! You can experiment with different colors and flavors of candy melts, such as chocolate or even peanut butter.
4. How do I keep my Rice Krispie treats from getting too hard?
Make sure to press the mixture gently into the pan. Pressing too hard can compact the Rice Krispies and make them dense and hard. Also, don’t overcook the marshmallows as this can make the treats tough.
5. How long will the candy melts take to harden?
Candy melts typically harden in about 10-15 minutes at room temperature. If you’re in a hurry, you can place the treats in the refrigerator for a few minutes to speed up the process.
6. Can I use a different type of cereal?
While Rice Krispies are the traditional choice, you can substitute with other crispy cereals like Cornflakes or any puffed rice cereal.
7. Can I make these ahead of time?
Yes, you can make these treats the day before serving. Just store them in an airtight container until ready to enjoy.
8. Can I add extra flavor to the Rice Krispies?
Yes, you can add a few teaspoons of vanilla extract or almond extract to the melted marshmallow mixture for extra flavor.
9. Can I use a different type of fat instead of butter?
You can use margarine or coconut oil instead of butter, though the flavor and texture may vary slightly.
10. How do I make these treats more festive?
In addition to colorful candy melts and edible markers, you can add fun sprinkles, heart-shaped candies, or other Valentine’s Day-themed decorations to make the treats extra special.
Conclusion
These Valentine Rice Krispie Treats are the perfect combination of fun, festive, and delicious. With their colorful candy melts and customizable decorations, they’re a great way to celebrate Valentine’s Day with family, friends, or a special someone. Simple to make and guaranteed to be a hit, these treats are the ideal way to show your creativity and sweet tooth in one go.
Print
Valentine Rice Krispie Treats Recipe
- Total Time: 20 minutes
- Yield: 12 servings 1x
- Diet: Vegetarian
Description
These fun and colorful Valentine Rice Krispie Treats are the perfect sweet treat for celebrating love! With vibrant candy melts and a simple marshmallow base, they’re easy to make and perfect for sharing with friends, family, or that special someone.
Ingredients
- 10 ounces mini marshmallows (1 bag)
- ¼ cup butter
- 6 cups Rice Krispie cereal
- ½ cup white candy melts
- ½ cup pink candy melts
- ½ cup purple candy melts
- ½ cup blue candy melts
- ½ cup orange candy melts
- ½ cup green candy melts
- ½ cup yellow candy melts
- Edible marker
- 1–2 tablespoons shortening (if needed)
Instructions
- In a large saucepan, melt the butter over medium heat. Once melted, add the mini marshmallows and stir until fully melted and smooth.
- Remove the saucepan from the heat and quickly add the Rice Krispie cereal. Stir until evenly coated.
- Press the mixture into a greased 9×13-inch baking dish, using a spatula to gently flatten and pack the mixture.
- Let the Rice Krispie treat mixture cool completely in the dish.
- In separate microwave-safe bowls, melt each candy melt color (white, pink, purple, blue, orange, green, and yellow) in the microwave in 20-30 second intervals, stirring in between. Add shortening if the melts are too thick.
- Once the treats have cooled, drizzle each candy melt color over the Rice Krispie treats, creating colorful stripes or patterns.
- Use an edible marker to draw hearts, initials, or messages on top of the treats if desired.
- Let the candy coating harden before cutting the treats into squares or fun shapes with cookie cutters.
- Serve and enjoy!
Notes
- You can adjust the colors of the candy melts to fit any occasion by switching up the colors.
- If the candy melts are too thick, add a small amount of shortening to thin them out.
- Prep Time: 10 minutes
- Cook Time: 10 minutes
- Category: Snack
- Method: No-Bake
- Cuisine: American


